Important: Before doing any electrical work in your home, you should consult with an electrician (I did!). Make sure the power is OFF, and use a voltage tester to make sure no wires are live. Be safe.
Want to see lots more awesome pictures of this fabulous DIY light fixture? Of course you do! Check them out right here in Part 1.
Here in Part 2 I’m going to provide the best tutorial I can for those of you interested in making your own DIY plumbing pipe light fixture! I’m going to show you how to build the shape of the light fixture but for liability reasons, safety concerns, and my own peace of mind, I prefer not to address the electrical wiring – you can consult a pro or find tutorials that cover wiring a light fixture elsewhere online.
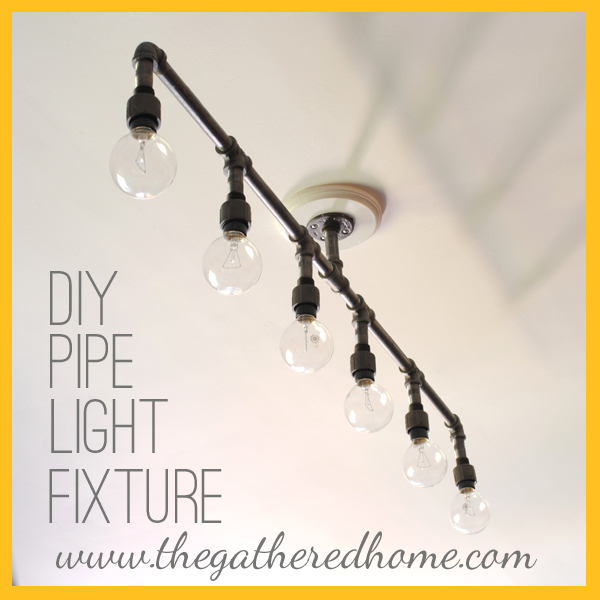
First, decide what you want your light fixture to look like. I based mine on the track lighting options I was considering for the kitchen, since I knew a long, narrow shape would work best. I mocked it up in Photoshop Elements for reference, at around 50” in length:

If you can imagine a shape composed of straight lines, you can probably create it! It helps to know a few basic plumbing pipe piece shapes and names, so you know what you have to work with. Also so you can keep a straight face as you’re rummaging through poorly organized bins and asking the plumbing department workers for the correct size nipples. *smirk*


Threaded Nipples. Yep, that’s the official name. These come in various lengths from miniscule 1” pieces to about a foot long. The perfect building blocks for our light fixture as they are pre-threaded on both ends.

Elbows, Tees, Flanges. These pieces are all connector pieces – they screw onto the threaded ends of nipples and let you form bends and t-shapes. The floor flange is a perfect top piece for securing your light fixture to the ceiling (more on that later).
I gathered the components for my light fixture over the course of several trips to Home Depot, basically brainstorming as I went. Lucky for you, I’ve created an inventory/shopping list below, as well as a handy budget breakdown at the end of the post!
For starters, I decided to use 1/2” black steel pipe. I chose the smallest diameter available to make the light fixture as light as possible. I also loved the industrial color of the black steel.
Shopping List:

*Contains affiliate links – you can also find these parts at your local hardware store. Prices vary, so be aware that online prices may be more expensive than in-store.
1. Six light fixture sockets. This is the kind of socket with two screws – a silver screw for the neutral wire, and a gold screw for the hot wire.
2. One 1/2” floor flange. I could only find this part in a galvanized finish, so I spray-painted it to match… More on that momentarily!
3. Six PVC Male 1” by 3/4” Coupling Adapters. Again, these pieces were spray-painted to match, since I could only find the size and shape I needed in white PVC pipe. I chose to go with PVC pipe after searching high and low for a part that the light socket could sit up inside (see detail photos below). It doesn’t actually screw together with the other metal parts, but I was able to push the two pieces together – it works.
4. Two 1/2” Black Steel Elbows. To create the arms hanging down on the left and right sides of the light fixture.
5. Six 1/2” x 2” Nipples. For the six short arms that hang down and connect to the light sockets.
6. Four 1/2” x 8” Nipples. To create the length of the light fixture.
7. Three 1/2” x 3” Nipples. One to hang down from the ceiling, the other to create the split portion in the center of the light fixture.
8. Five 1/2” Tees. To hold the arms of the light fixture. $1.86 each, $9.30 total.
And this is the spray paint I used: Rust-Oleum Bright Coat Metallic Finish Dark Bronze. It was a near perfect match for the black steel pipe:


Here are the parts all laid out so you can see how this light fixture comes together:

And assembled (and wired):

Again, I am not an electrician, so this tutorial is going to stop short of wiring instructions. Feel free to consult other tutorials online if you pan to DIY it, but I highly encourage you to seek the advice/expertise of a licensed professional.
I will say that basically, you need to wire the light fixture while you are assembling it. I started with the farthest arms and worked my way inward, screwing the pipes together as I went, which was much easier than fishing the wire through the completely assembled fixture.
Closeup photos. You can see how the light socket fits up inside the PVC adapter:


Actually hanging the light fixture was beyond my expertise, so I called in my dad to do the honors. As such, I do not have advice besides: have someone who knows how to do these things do them for you. If you are the one who knows how to do this, then you’re golden. (I am beyond impressed!)
Here is a closeup shot so you can see how we hung the light fixture:

That is a 7” wooden plaque from Michael’s ($1.99) painted with white ceiling paint, with a 3/4” thick hole drilled through the center.
[Again, at this point, double check that the power is off. I know you already did, but do it again anyway for me, okay?]
We first mounted the wooden plaque to the junction box, pulling the wires through the hole in the center. Then we connected the wires to the wires in the light fixture with wire nuts. Finally, we screwed the metal floor flange onto the wooden plaque.

Now, at this point, your arms will be tired from holding the light fixture up above your head while installing it, but your heart will be warmed and your eyes will be blinded by the supernova of incandescent delight happening above your head. God bless those 60-watt energy hogs.
(Would Edison bulbs look fantastic in an industrial light fixture such as this? Yes, indeed they would. But goodness knows I am much too cheap to spend that much on a single light bulb. So I settled for clear round bulbs and my wallet is thankful.)
Speaking of which, are you ready for my budget breakdown? (Keep in mind, prices may vary depending on where you source your parts.)
Plumbing pipe parts and fittings: $48.31
Light Bulb Sockets: $19.44
Spray Paint: $5
Wire: $22 (This cost was for much more wire than I needed and used in this project)
Wooden Plaque: $2
MY TOTAL: $97.
Not counting the light-bulbs. Because light bulbs aren’t sexy. And I like to think that I kept this project under $100.
NOT BAD for totally rad, industrial, modern, hand-made awesomeness!

So what are you waiting for? Get thee to the hardware store in throngs and greatly perplex them as to why their plumbing department is full of crazy-eyed people searching high and low for the right-sized nipples! 😉
Obligatory closing disclaimer: Once more, I am not an electrician. I highly recommend that you consult with an electrician before doing any electrical work in your home. Got it? Good!


I wanted to pin this, but I did not see a button. I went to your Pintrest account, but I could not find a pin there either. Is there one that I am missing? If not, you need to make one because I think this could do very well on Pintrest.
Hi, capeofdreams – I have a hovering "pin-it" button built into my site, and I do have this pinned on Pinterest in my "Gathered Home" board. I wonder if the pin-it button isn't working in a certain browser? I'll look into that!
Yay, love it and will pin 🙂
Yay, Julia, thank you 🙂
Do you think it would be possible to do with PVC pipe (such as conduit) instead of the steel, in order to make this project even more budget-friendly?
Yes! PVC would make a much lighter-weight light fixture as well! I originally fell in love with the industrial "black steel" finish, and worried that spray paint wouldn't look the same. However, I found that the Dark Bronze spray paint was an almost-perfect match, so you could definitely make a PVC pipe fixture that looks just like steel!
Let me know if you try it – I'd love to see pictures!
Hi Brynne! I was just doing my blogging tonight and stumbled upon your light project. I think it is amazing and great tutorial!! I pinned this and will start following you!
Best of luck blogging!
Debbie
Thank you Debbie! 🙂 I'm so glad you stopped by!
Where did you purchase the industrial pipe/plumbing parts?
Hi! All the supplies for this project came from Home Depot, but I'm sure you could find the pipe fittings at other home improvement stores as well!
LOVE IT!!! Gonna make one for myself. Just want to let everyone know, that Lowes will cut galvanized plumbing pipe for FREE and even thread it for free. Doing it that way will also make the project budget friendly. How do I know this? Well, I just got finished making a plumbing pipe table. Instead of buying each "threaded nipple" piece off the shelf… buy a 10', 12', 14', etc. piece instead, and then have them cut each piece to length. This will take some math to convert inches to feet, but by doing it that way you will see a significant savings!! I saved $50 bucks!! Don't tell Lowes I told you this, lol… the guy in the plumbing department only told me he could cut me my pieces when they didn't have enough of what I wanted stocked on the shelf. I think it might be a well kept secret 🙂 Also, for the gal who wants to know if you could use electrical conduit instead, DON'T DO IT!! I learned that one the hard way! They will not cut conduit, and conduit is too thin to thread! I tried to "weld" conduit to threaded plumbers pipe using JB WELD.. what a failure!! Go for the real deal, but do it the smart way and have Lowes cut & thread the pieces for you! Oh, one more thing…. It's a good idea to wash your piping before spray painting. Black piping & galvanized pipe has an oil coating on it. Wash with a good de-greaser, then rub some white vinegar on it, and let dry. White vinegar will naturally etch the metal for better paint adhesion. I love sharing helpful hints!! Good luck in making yours 🙂
Leigh-Ann, thanks so much for commenting with those awesome tips! The guys at my Home Depot weren't willing to jump in and cut and thread all the pieces for me, but that's very good to know 🙂
Please send me pictures if you make this light fixture – I'd love to see them!
You can use conduit. That's what electricians use every day. You can even buy conduit benders to form it into all sorts of shapes, similar to pipe cleaners. It is easier and cheaper to work with. You just have to buy the right fittings.
We used electrical conduit for bunk bed railing, and will probably be doing the same for a fixture like this…A few tips if you want to use conduit (which is CRAZY cheaper).
1-get a plumbing pipe cutter, they cost about 2 bucks, and it will take a few minutes, but it will cut the conduit without bending
2-you might have to add some tape to the end of the pipe to make the fitting secure (which is not ideal)
3-Home Depot told me they would cut the steel pipe, but that it needed to be about 18 inches or longer to get a good cut on it
I used plumbing pipe to make curtain rods for my screen in porch. I had Home Depot cut & re-thread my pipes, multiple times. Math is NOT my best friend. I also 'washed' my parts with Goo-Gone to get rid of the dirt, oil, and price labels.
I'll have to try the vinegar trick when I make this wonderful project!! Thanks for sharing and I think I'll splurge for the Edison bulbs.
Thanks Wenonah! It's so good to know that Home Depot will cut & rethread – I guess I was too bashful to press the issue 🙂 I would so love to see pictures if you make a plumbing pipe light fixture!
Um… 1) you are HILARIOUS! 2) THANK YOU! I've been brain storming industrial lighting shiz for months since I've been home and now, a fire under my ass has been lit. I'm hitting the hardware store this week!
AWESOME! I'm so glad this was inspirational for you – I would absolutely love to see photos of the finished product! Send them my way!
This looks so nice! Love it! Also, as others have mentioned, no pin button. I'm using Win7/Firefox26.0.
Thank you Debs! I'll try to get to the bottom of that pin button issue – thanks for sharing your OS/browser info 🙂 For now, here's a handy link for easy pinning on Pinterest: http://www.pinterest.com/pin/273523377341840237/
Can you make this out of pvc pipe instead??
Hi! I don't know much about how pvc parts fit together, but other commenters mentioned they thought it would work, so I'd say it's worth a shot – you can visit the hardware store and play around with how the pieces fit together before committing!
FANTASTIC!!!
Great Design! Kudos. I wonder how this would look/cost in the US – I'm under the impression that only Compact Flourescent Bulbs are legal in 2014 in the US. I hope I'm wrong.
Yes, I've worried about the same thing myself! I'm in the US and can still purchase incandescent bulbs at the moment, but it might be time to stock up! I've also seen some cool looking cfls recently, so perhaps there's hope there as well 🙂
Just saw this fixture on Pinterest and repinned it. I found LED G25 – 10 Watt – 60 Watt Equal bulbs online and they must be in stores.
really awesome. Will try to make one myself but I'm pretty sure I'll have troubles with the wires
I have to say, I was very timid about the wiring myself, but with a few wiring projects under my belt now, I can assure you that it isn't that bad! It's almost plug and play – hopefully that tutorial I linked to will give you confidence 🙂
Excellent…I am fully impressed your post…
This is awesome! Pinned 🙂
Thank you Katie 🙂
Amazing light. I'm going to try to make it. But before I do I have a few questions. Can you provide more detail on how you managed to get the light sockets to stay up since they don't screw in. Also, did u have to use special insulated wiring for safety.
Thank you Curtis!
I was able to kind of "screw" the metal fitting into the PVC piece as the PVC is softer – although the two pieces aren't designed to connect, I managed to lightly attach them that way.
The wire I used is coated in some sort of plastic – I spoke with a local electrician at Home Depot and he helped me find the correct kind to use which is pictured in the post. Since I'm not an electrician, I don't want to give the wrong advice – this is why I haven't provided detailed wiring instructions in the post but instead linked to the tutorial I used.
Good luck!
Hi Matt – the sockets are not connected to the PVC – they just hang in there. The lightbulbs are light enough that the wires don't have a problem supporting them. The sockets are wrapped in electrical tape for extra support too!
Along those lines, once you screwed the metal fitting into the PVC, how did you get the light sockets themselves to stay in the PVC? I see where you say you pulled the wires taut, but are the sockets themselves connected to the PVC or the metal fittings in any way or are they just kind of hanging in there? Thanks for posting this how to!
I can't wait to do this! I can't seem to get the wiring tutorial link to work though. Do you have any suggestions or did you maybe save it in some format that you could possibly email it?
Hi Lizzy! Thanks for letting me know – I guess they moved the tutorial, but I tracked it down & updated the link!
Thank you! Guess now I have no excuses left. Can't wait to see this bad boy done!
I love the look of pipe lighting. And she has done a nice job. But please keep in mind that you need to pay some attention to UL guidelines. Those are the rules that manufactures follow when they make lighting. If you don't follow the rules, there is a risk of fire or shock. If there is any resulting damage or injury, the maker of the lighting could be in some legal trouble, not to mention risk of less than full insurance coverage. Imagine a fire cause by the lights that killed a visitor in your home.
UL issues might include:
-The sockets are not secured in the PVC pipe end fitting.
-There are no "underwriters knots" in the wire (http://www.animatedknots.com/underwriters/)
-The wire looks very thin so I'm not sure if it's up to the standards.
Please be careful.
Hi RK – thank you for comment and the helpful information you provided!
I've learned a lot since making this light and I would actually like to rewire it differently, so I will be removing any wiring information from the post for the time being.
Thanks!
I used a link to this post in a blog post I did because I used the bases of your light idea for a project I had done. Thought you might like to see it as well 🙂 https://artsyfartsyfairy.wordpress.com/2015/08/10/update-2-2/
Thanks so much for letting me know, Colleen! I’m so glad the post was helpful and it always makes my day to see how it’s been put to use! 🙂
This is perfect for ceiling lighting in my unfinished basement! The pipes to my house run along the basement ceiling, and I’ve been looking for inexpensive industrial look lighting ideas. I should be able to do this with vintage “industrial look” LED light bulbs. Whoo hoo!
can you tell me the actual light bulbs you used?????? I need THOSE for another project
Thanks
Sure! They are 60 watt incandescent bulbs – usually sold as “vanity” bulbs since they are the type you commonly see in those bathroom light strips. However, I’m not sure if they’re available any longer because of the ban on incandescent bulbs… I haven’t had to replace one in the last two years, so I’m not sure. Good luck!
I have a question is that safe to have a industrial lamp without ground wire?
I’m afraid I’m not qualified to answer that question – I would always recommend consulting an electrician with any questions before starting a DIY lighting project.
hi there, fantastic creation. I can’t work out how the lamp fits to the pipe work, would you mind explaining a little further? thank you 🙂
Thank you so much, Ross! I tried to be as clear as possible in the tutorial, but it is a little hard to explain certain aspects. The light socket sits up inside the PVC coupling adapters, and the coupling adapters are somewhat screwed onto the metal nipples, although I think some construction adhesive would also be a great way to attach them together. I hope this helps!
All the best,
Brynne
thank you brynne I understand now 🙂
I think this light is fabulous, but I have one question. Is it UL listed because I can only use UL listed lighting.
Hi Hillary,
Thank you! I’m so glad you like the design 🙂
Since it’s a DIY light fixture, it is not UL listed. I’m not entirely sure what that entails, but I think if there’s any concern it would be best to consult an electrician.
All the best,
~ Brynne
I love this light, nice work! I like your ideas. Thanks for posting. Funny question, but what is the tile that is in your photo? I love it!
Thank you! I wish I could tell you about the tile, but it was in the house when we bought it. It’s a porcelain/ceramic tile meant to look like slate, if that helps at all!
Thanks anyway!
Hi Brynne,
started to make the pipe light fixture today but was a little baffled about screwing together the pieces with the wiring strung through them…every time I get to a ‘Tee’ piece & try to screw it to the pipe the wire wraps around the other wire inside the pipe & is pulled up into the ‘Tee’…
I’ve tried going from the outside piece toward the center but I keep having the same problem.
Maybe I’m using the wrong kind of wire, I don’t know.
Could you explain this process a little more…
Hi David,
I can totally visualize what you’re saying and the difficulty you are having. And I’m really kicking myself right now because I made this light three years ago and I remember the tees posing a bit of a problem when wiring, but I’m having a hard time remembering exactly how I handled it. (I decided not to document exact wiring instructions in the post because I’m not an electrician and didn’t want to steer anyone in the wrong direction!) You definitely want some extra wire so there is some wiggle room… You might also try putting together the length of the light fixture first and then feeding the wire through so you can fish it through each tee. I really hope this helps!
~ Brynne
Cool design. How exactly did you connect the the wooden plaque from Michaels to the junction box?
Hi Jared – I drilled holes in the plaque that corresponded to the junction box and used threaded screws to hang it. However, I am not an electrician, so please consult one for advice on hanging this light fixture in your own home!
what light fixture (blub holder) did u use not too clean on the picture and hoe did u attach it to the pipe
It is a little hard to explain certain aspects. The light socket sits up inside the PVC coupling adapters, and the coupling adapters are somewhat screwed onto the metal nipples, although I think some construction adhesive would also be a great way to attach them together.
I hope this helps!